Since I got my Clover Amour hooks, I’ve been enamored with them. They’re cute, they’re comfy for a pencil hold, annnd they are each a different color! I knew I wanted to make them a little rainbow nest to keep them nice and cozy, and I especially wanted to be able to peek at each hook’s label. So, here it is all finished and a pattern for ya if you are interested in making your own!

I’m using US terms for my stitches. Here is a brief listing of the stitches you’ll use in this pattern. For more explanation on any stitches, there are loads of wonderful video and photo tutorials out there!
- Ch: chain. Yarn over and pull yarn through.
- Sc: single crochet. Insert your hook into the next stitch. Yarn over and pull through the previously made stitch. You should now have two loops on your hook. Yarn over and pull through both loops on your hook.
- Sc inc: single crochet increase. Place two single crochets into one stitch.
- Sl st: slip stitch. Insert hook into the next stitch. Yarn over and pull through the loop on your hook.
Materials that I used:
- Yarn: “Big Twist” worsted weight yarn, pulled from both their “Soft” and “Value” collections. I used are deep red, red, burnt orange, gold, varsity yellow, avocado, forest green, denim, violet, and soft gray. Of course, you should absolutely use whatever colors you love. This pattern will specifically reference the colors I chose to help you line up the instructions with the photos.
- Hook: 4.5mm (7) hook for the bulk of the pattern, and 5.0mm (H) for any starting chain stitches.
- Large eyed needle: For sewing in yarn ends.
- Stitch markers: For keeping track of special stitches. You should need at most 5 at any given time.
- A button: A 1 1/8 inch diameter button or similar.
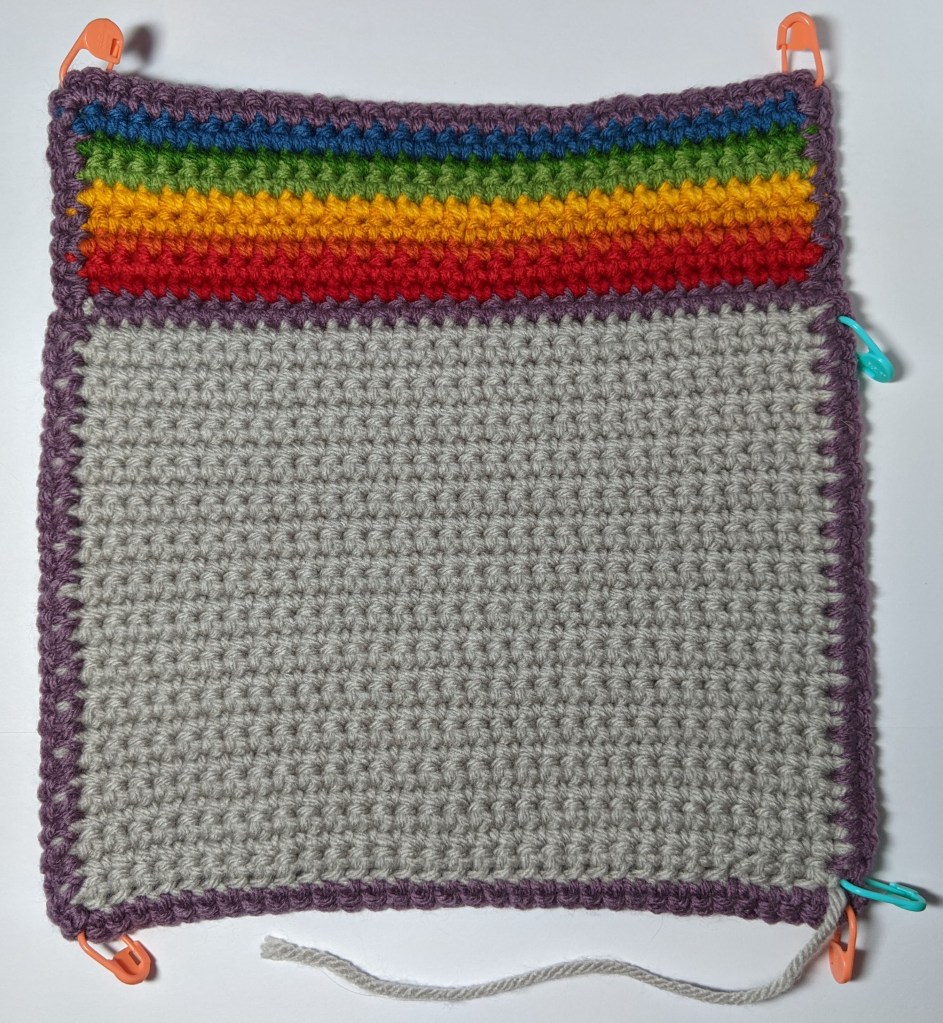
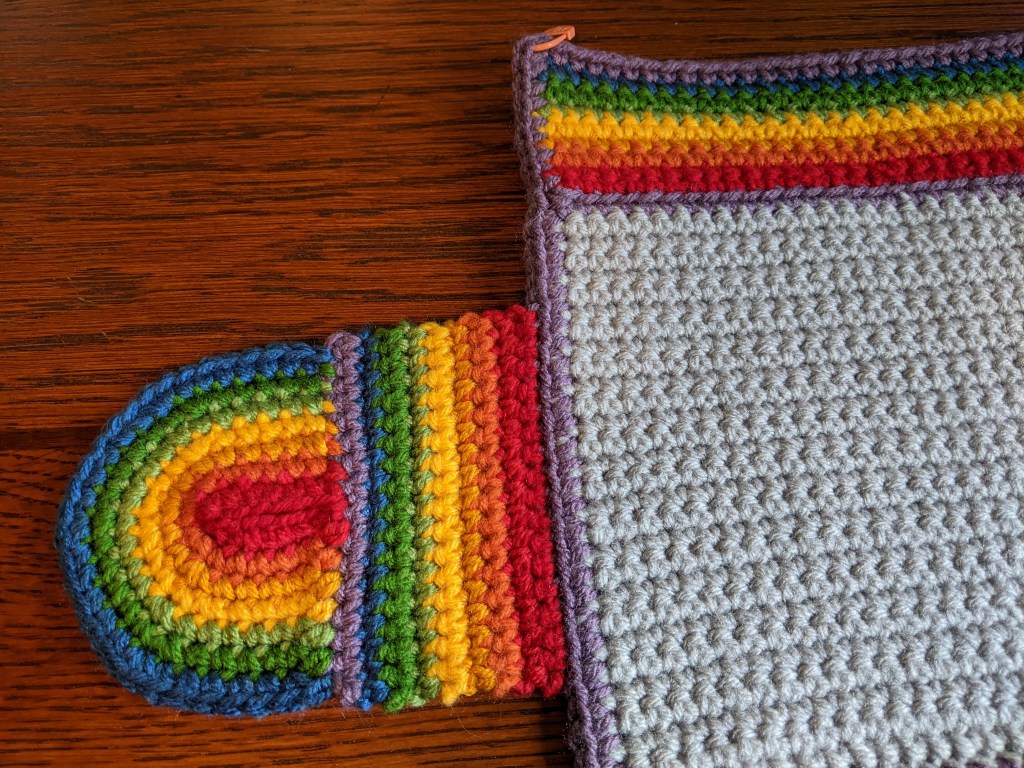
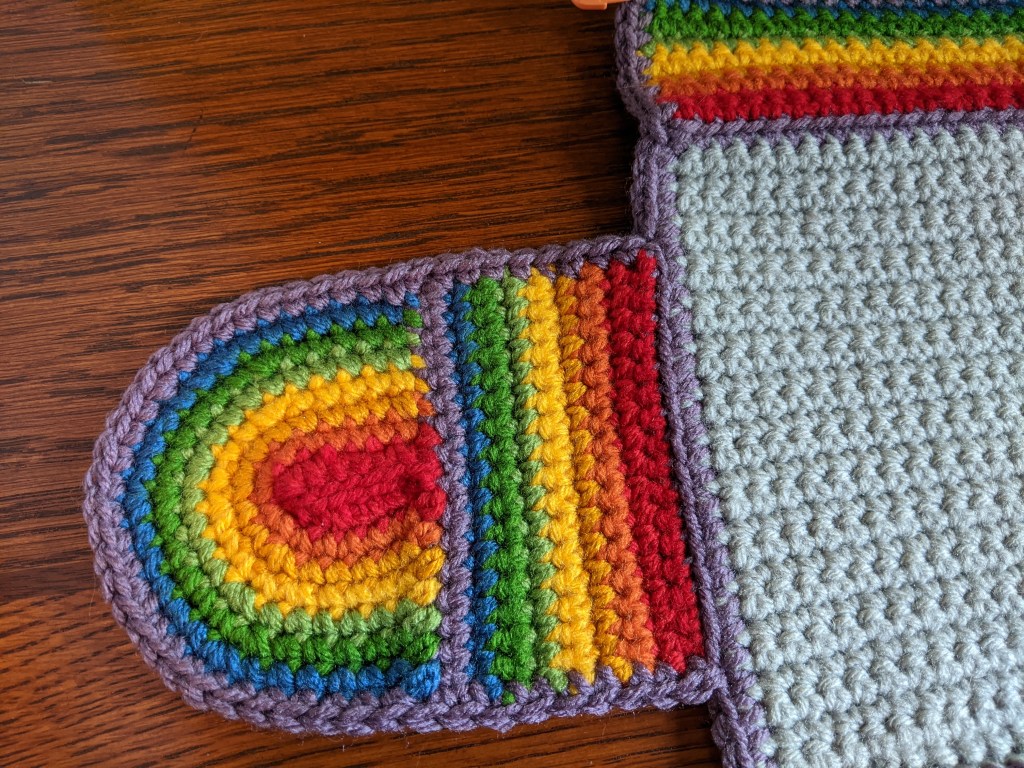
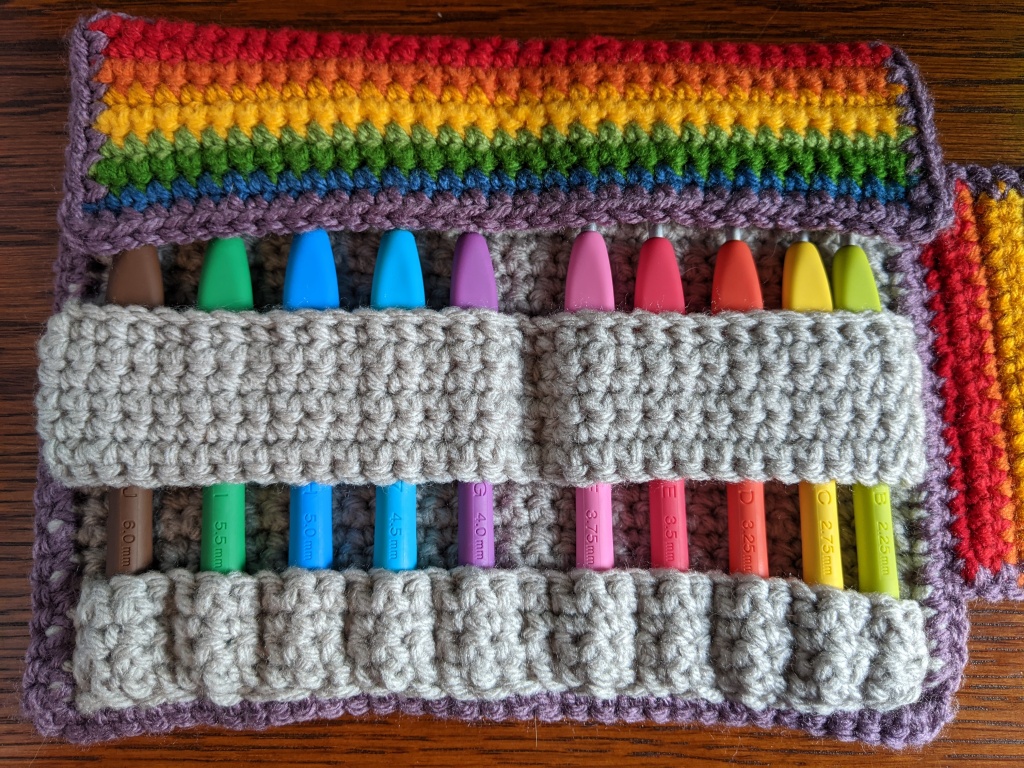
The case can be thought about as five sections. It might be helpful to refer back to this photo as you go, so you can seethe overall idea for each piece:

First, we’re going to create the backer and top flap of the case.
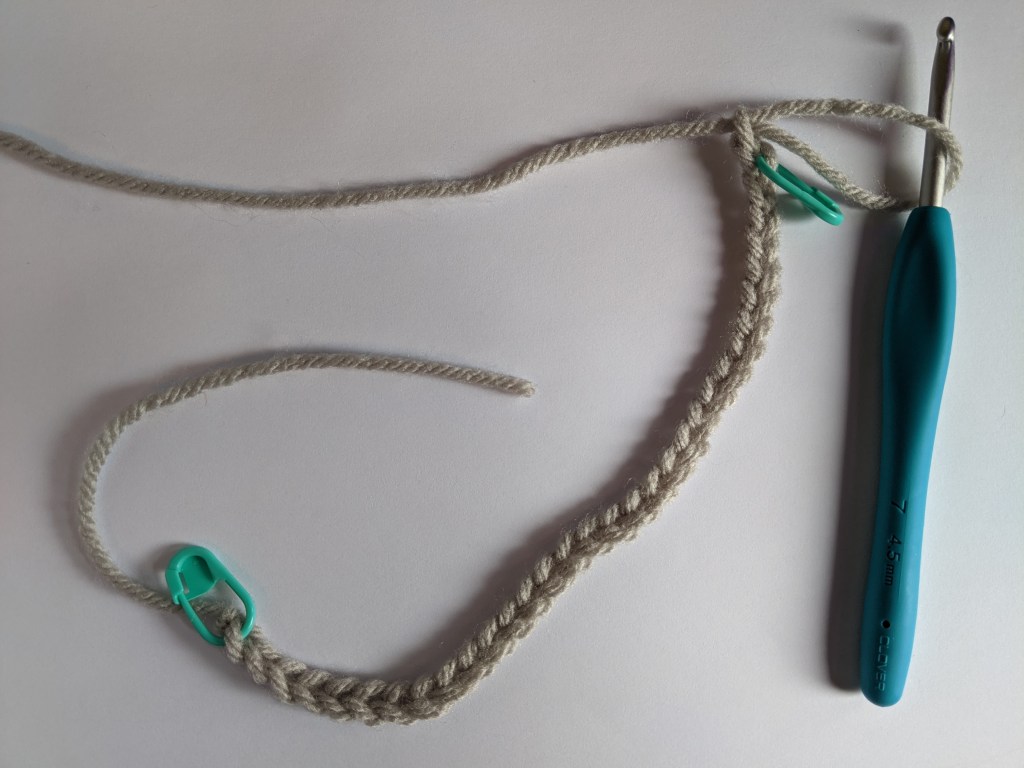
Using soft gray, ch (chain) 33 with your 5.0mm hook. Place a stitch marker in the bottom loop of the very first chain stitch and the bottom loop of the 2nd to last chain stitch. You’ll leave these markers in for a little while.
As always with starting chains, make sure it doesn’t get twisted up. It should look a little something like this, where you can see the sideways “V” shape of each chain stitch:
From here, you’ll be making lots of rows of 32 sc (single crochet) each. I suggest keeping your tension fairly tight for this, as you’ll end up with a slightly more rigid final product that will somewhat hold its shape. If you’ve done amigurumi before, my approach was similar to what I do for little stuffies.
- Row 1: You’re going to start by working into the 2nd chain from your hook – the one you put a stitch marker into. Sc into the top loop of each chain stitch. There should be 32 sc for this first row. I sometimes find it a little tricky to keep track of that first sc in the first row. If you have any trouble with this, you can always use a stitch marker.
- Rows 2 through 28: Turn your work by flipping it and working into the stitches that you just completed in row 1. (From now on, we’ll just say “turn” for this maneuver.) Ch 1, and then sc 32 all the way across. Now repeat this until you’ve made 28 total rows of soft gray sc.

Now you can fasten off the soft gray yarn and weave in the ends.
Okay, great! You have made a grey rectangle! Not to worry; I promise that the “rainbow” part of this whole thing is coming soon.
Lay your hooks out on the grey rectangle – they should lay perpendicular to the rows of sc. If the grey rectangle is slightly taller than your hooks, you are in good shape! If not, review your work to see if you missed any rows or added extra. Depending on your yarn and tension, you may just need more or fewer rows than I did.
Turn your work just like you did for the previous rows. You’re now going to start working with violet. There are different ways to start a new row with a new color – feel free to use your favorite way here. I usually like to fasten off the previous color, create a slip knot on my hook in the new color, and then sc right into the stitch I’m interested in.
Now sc 32 all the way across with violet and then fasten off. This was Row 29 and the backer is now complete!
It’s time to start the top flap. You’re going to continue on with more rows of 32 sc. I’ll continue the row counts where we left off.
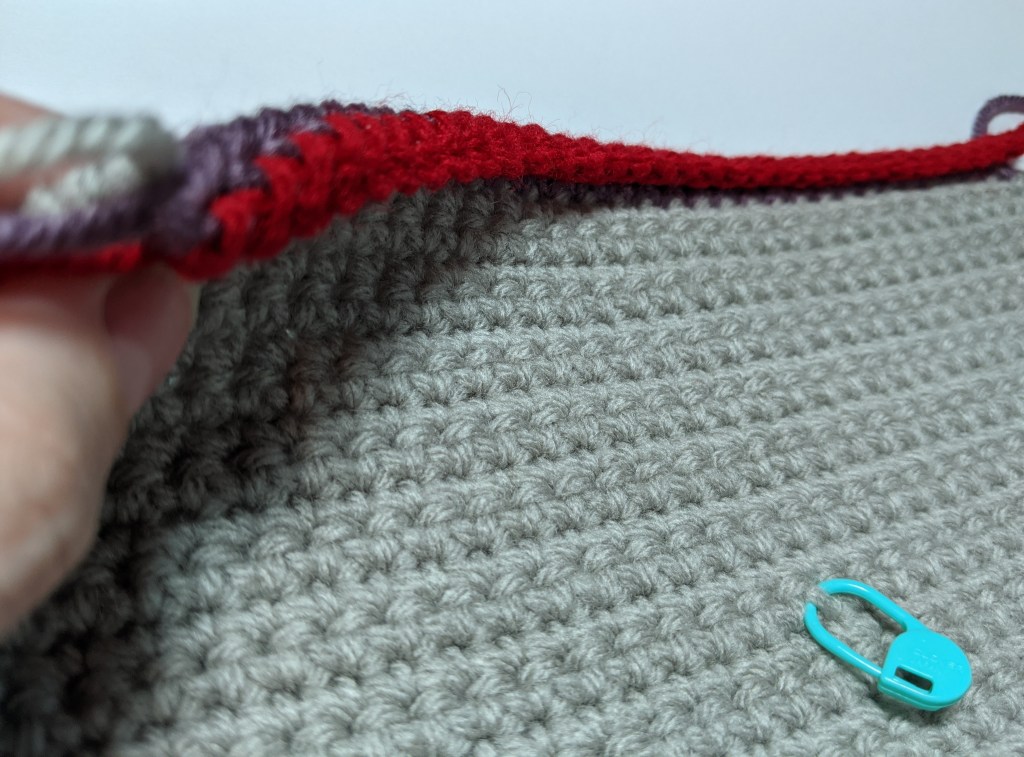
Row 30: Switch to deep red. Sc 32 in the front loops only. This means that you’ll only be working into the loops closest to you from the previous row. This is going to make the top flap a little easier to fold down toward the inside of the case. You may want to use a stitch marker to indicate the inside of the case if you’re at all worried about losing track of which way is which. Here’s my deep red row and stitch marker:
Rows 31-37: Each row in this section will be a different color, moving through the rainbow from red to denim! So for each one, you will turn your work, start with the next color, and sc across. Weave the ends in as you go here, as you won’t be using them for anything.
On the 37th row, place a stitch marker in the first and last sc. This means you should now have four or five stitch markers on your work: one in each “corner” of the backer/top flap, and an optional marker indicating the inside of the case.
Now, you’re going to create a border around the entire backer/top flap. You’ll want to decide which side of the case you want to look “nicer” – this will be the side you want facing you as you work the border stitches. I chose the outside of the case for this.
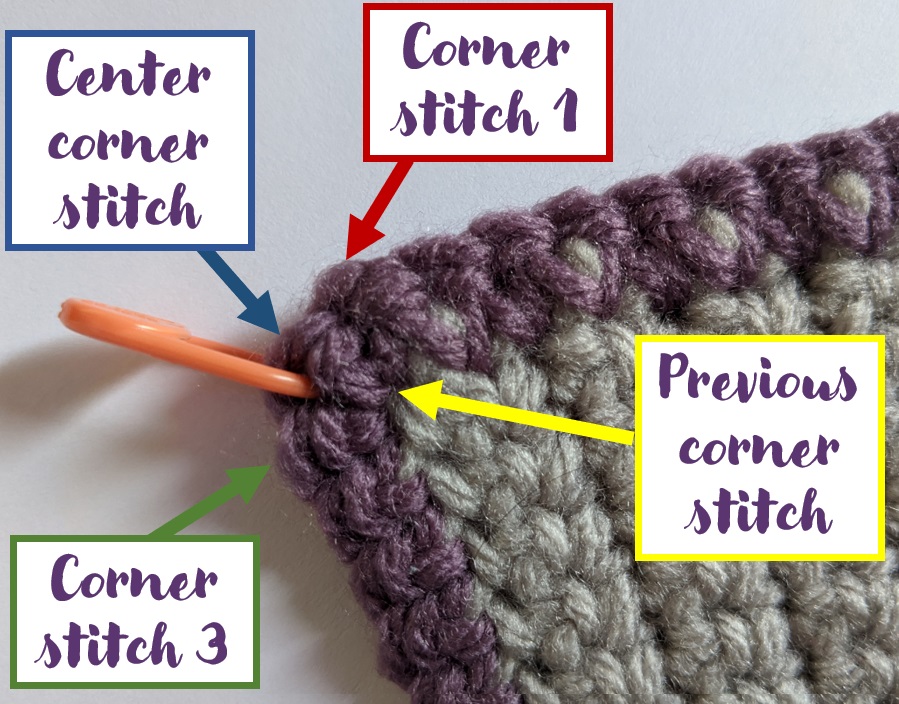
To create the border, I used violet and started in the bottom left hand corner (again, as the outside of the case faced me). You should have a stitch marker in each “corner” of the back/top flap – instead of just one sc in these, you will be making three sc. This will help create a corner-ish shape. Take out your previous corner stitch markers and replace them into the center stitch of each 3 sc corner. Here’s what a corner will look like:
Now, work your way around the whole big rectangle with sc, and don’t forget that you want 3 sc in each corner. When you’ve made it back to where you started, slip stitch into the first sc you placed for the border, fasten off, and weave in the ends of the violet yarn.
As you can see, my backer/top flap edges weren’t very straight and didn’t lay flat. If yours isn’t feeling super rectangle-y, you can block it! For more info on how to block a crochet piece, there are lots of helpful tutorials out there. I suggest especially making sure that your blocking technique is safe for the type of yarn you’re using (acrylic, cotton, etc.).
See below for what my backer/top flap looked like before and after blocking. You can see that it’s still not perfect but looks a whole lot better. Of course, I photographed this with the less tidy side of the border facing up… ah, well! :)

Ta-da! The backer and top flap are now done!
Now, with the inside of the case facing you, you’re going to create the side flap on the right side of the backer. The side flap will look a lot like the top flap, just skinnier. The side flap is made up of two parts: nine rows of 17 sc, and then several rainbow arches that surround the buttonhole.
Let’s start with the nine rows of 17 sc:
- Row 1: I used deep red for the first row. Starting in the bottom right hand corner stitch marker (as the inside of the case faces you), count 8 stitches to find your starting stitch. This will make the side flap centered vertically on the backer. (You can start the side flap wherever you want, though!) Sc 17 in front loops only.
- Rows 2-9: Each row is a different color, moving through the rainbow from red to violet. Turn and sc 17 for each row.
Weave in all those colorful ends to get them outta your way.
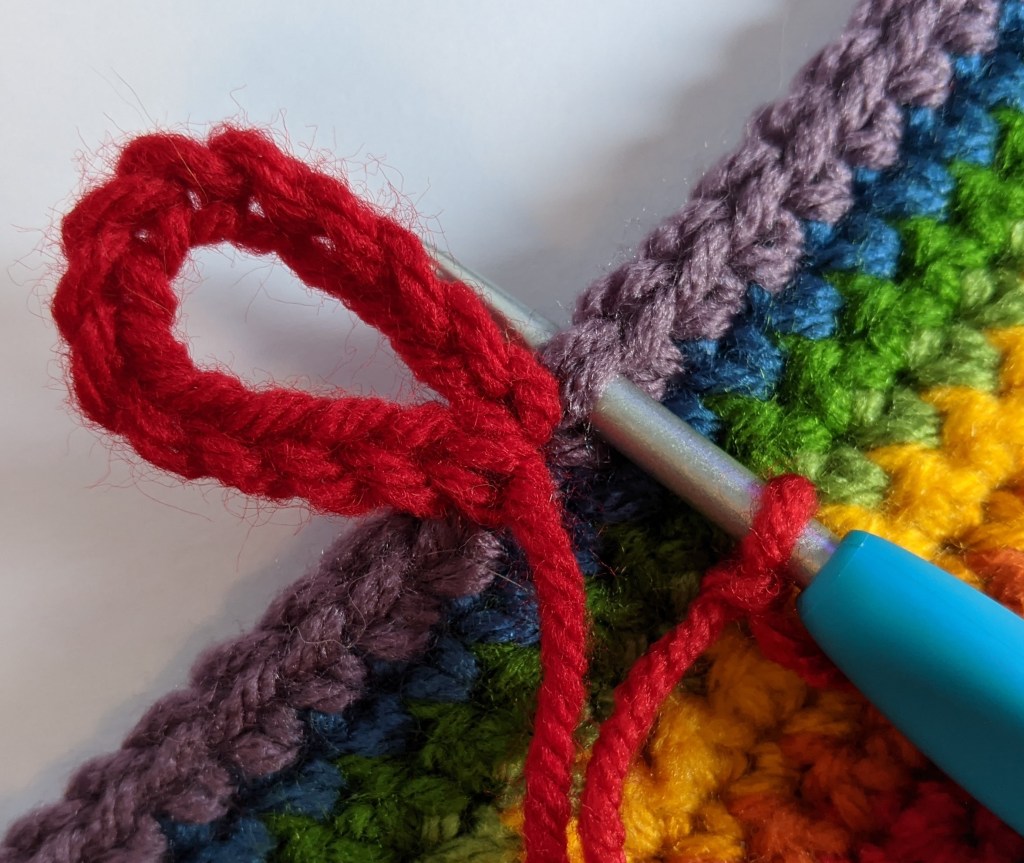
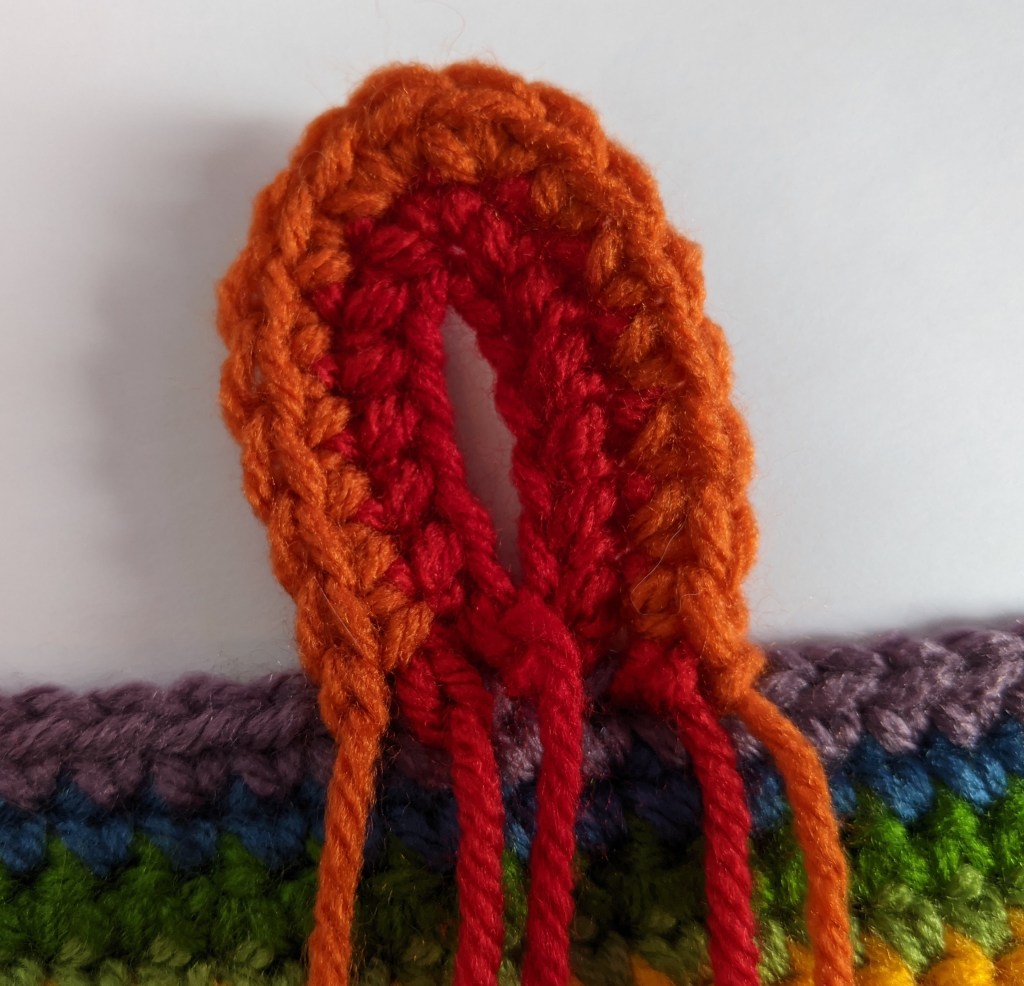
Now we’ll create the rainbow buttonhole out of a small chain. Find the center stitch of the 9th row of the side flap. Here, you’re going to take deep red yarn and chain 13. Then, slip stitch back into that same center stitch of the 9th row. This proved a bit difficult to explain in words, so here’s maybe a better depiction of what’s happening:

Next you’ll create a rainbow surrounding the chain 13 buttonhole by making a series of arches. Each arch is a different color, moving through the rainbow from red to denim. I’ll describe the first couple of arches in detail first.
The number in parentheses shown at the end of each arch indicates how many stitches you should have in that arch, not including the slip stitch at the end of each arch.
Arch 1: Switch to red. Slip stitch in the stitch just to the right of where the buttonhole is attached to the side flap. Again, words are hard here I think. Here’s a picture of where you’re joining on:
To create the arch, you’ll work in just the top loops of the chain 13 buttonhole: sc 6, inc 1, sc 6.
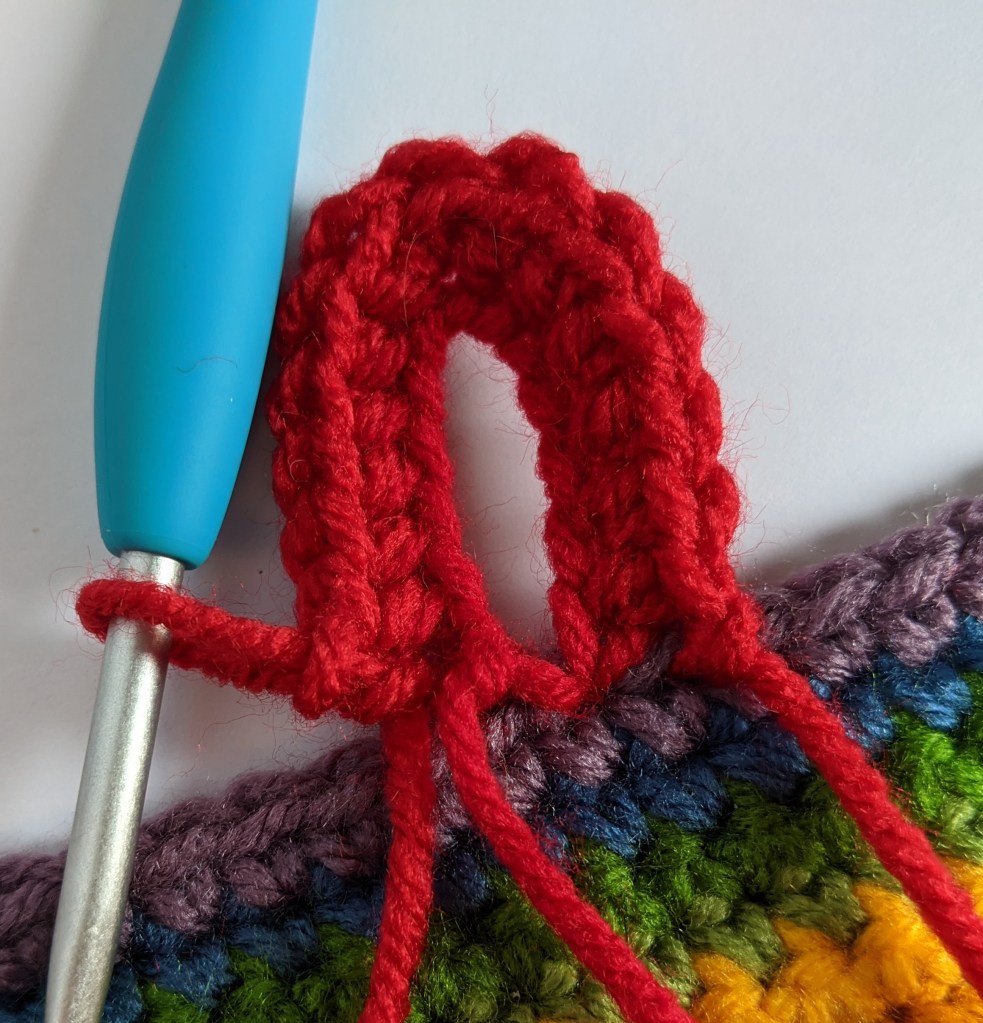
To finish the arch, slip stitch into the stitch just to the left of where the buttonhole is attached to the side flap. The arrow in the left hand photo below is showing where you’re placing the slip stitch:
Fasten off the red yarn. (14) — this means you should have 14 stitches of red in this first arch. You’ve made the first one! Your slip stitches might get a little loose while you’re working, so you can pull those snug as you need to see how they’ll look when you weave in all the ends.
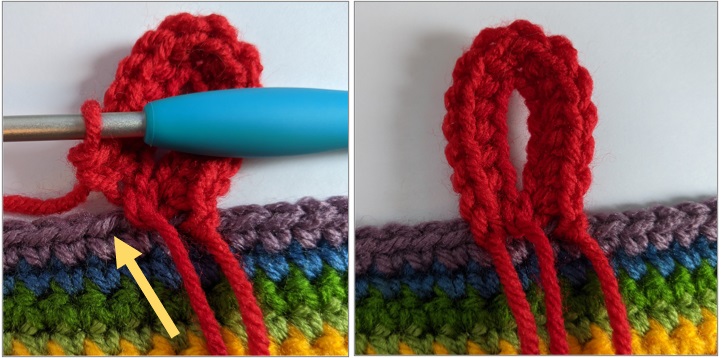
Arch 2: Switch to orange. Start in the stitch just to the right of where you started the red arch. Work in the red arch’s stitches: sc 6, sc inc 2, sc 6. Fasten off. (16)
As you’ve seen so far, each arch will start one stitch to the right of the previous arch’s first stitch, and end one stitch to the left of the previous arch’s last stitch. I’ll leave that part out from here and just get to the meaty stitches:
- Arch 3: Gold. 7 sc, sc inc, 2 sc, sc inc, 5 sc. (18)
- Arch 4: Varsity yellow. 5 sc, sc inc, 3 sc, sc inc, 3 sc, sc inc, 4 sc. (21)
- Arch 5: Avocado. 9 sc, sc inc, 4 sc, sc inc, 6 sc. (23)
- Arch 6: Forest green. 5 sc, sc inc, 5 sc, sc inc, 5 sc, sc inc, 5 sc. (26)
- Arch 7: Denim. 7 sc, sc inc, 5 sc, sc inc, 5 sc, sc inc, 6 sc. (29)
You did it! Now weave in all those ends. Here’s a view of the side flap so far from the outside of the case.
It’s time to border the whole side flap with violet.
- Join onto the backer border just to the right of where you started the first 17 sc row of deep red.
- Sc along the sides of the rows of 17 sc.
- Once you reach the arch portion, you’ll make one last big arch: 10 sc, 1 sc inc, 7 sc, 1 sc inc, 10 sc.
- Continue along with sc until you meet the backer again.
- Slip stitch into the backer, fasten off, and weave in the ends.
This might be a good place to stop and take stock of what you’ve made so far! Here’s what it should roughly look like, with the top flap folded down toward the inside of the case:

Next, we’ll create the lower hook pockets, which are made from a 4 row rectangle in soft gray:
- Ch 31 with 5.00mm hook.
- Starting with the 2nd ch from your hook, sc 30.
- Rows 1-4: Turn, sc 30.
- Leave a long tail, about 36 inches or so, and fasten off.
You’ll be using that super long tail to sew the rectangle onto the backer and form the individual hook pockets. Place the rectangle onto the backer with the inside facing you. I think it helps to visualize and plan ahead a bit how you’ll be sewing the lower pockets on. Below is a diagram showing where you’ll be sewing and which hooks I recommend going in which pockets.

Basically, each hook gets a 3 stitch wide pocket, except for tiny hook B which only needs two (plus a little wiggle room from the turning chains – see note below). Some general notes on how I recommend you approach sewing the lower hook pocket onto the backer:
- Positioning the lower hook pocket just to the left of the right backer border, and just above the bottom backer border.
- Sew the leftmost and rightmost sides along the ch 1 stitches you made at the beginning of each row of the lower hook pocket – this will give hooks J and B a little extra wiggle room!
- Along the bottom, sew into only the front loop of each stitch on the locker hook pocket.
Take that super long soft gray tail and start sewing into the backer. I recommend stopping after sewing each pocket to make sure that the hook fits. You might have to wiggle them in a bit the first time to get the yarn to stretch into pocket shape.
Also, make sure you’re working along the same number of stitches on the backer as you are on the lower hook pocket, otherwise you’ll end up at the end with mismatched edges. It helped me to put stitch markers into the violet border of the backer to help me keep track:

Here’s what it will look like after sewing in each pocket!
Finally, we’ll create the last piece: the upper hook strap, which is made of six rows of 34 sc each:
- Chain 35 with 5.0mm hook. Start with a tail that’s 7-8 inches, because you’ll use it to do some sewing with it later.
- Switch to 4.5mm hook.
- Row 1: Starting in 2nd chain from hook, sc 34.
- Rows 2 through 6: Turn. Ch 1, sc 34. Leave a 7-8 inch tail.
You’ll probably notice that this strip is wider than the backer. This is to give space for the hooks’ wider handles toward the top; otherwise they all get squished in toward the center.
Sew the far left and right sides of the upper hook strap just inside the backer’s violet border. Position the strap vertically to your liking – I wanted the hooks’ labels to be centered between the upper hook strap and lower hook pockets.
After you sew the strap, it’ll be a bit floppy. Press it down so that it hugs/bends around the leftmost and rightmost hooks:

Now, you’ll sew the center of the strip to separate the hooks into two groupings:
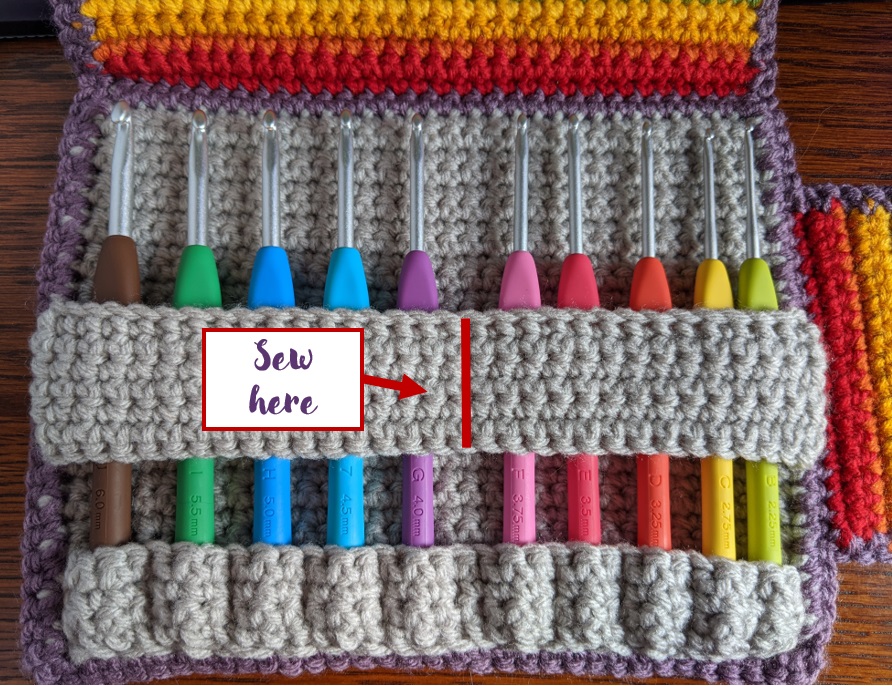
After sewing the center, your hooks will stay in place a little better! You may want to sew individual pockets for your hooks similar to what I did here for the bottom, but I found it a little too restrictive for taking them in and out.
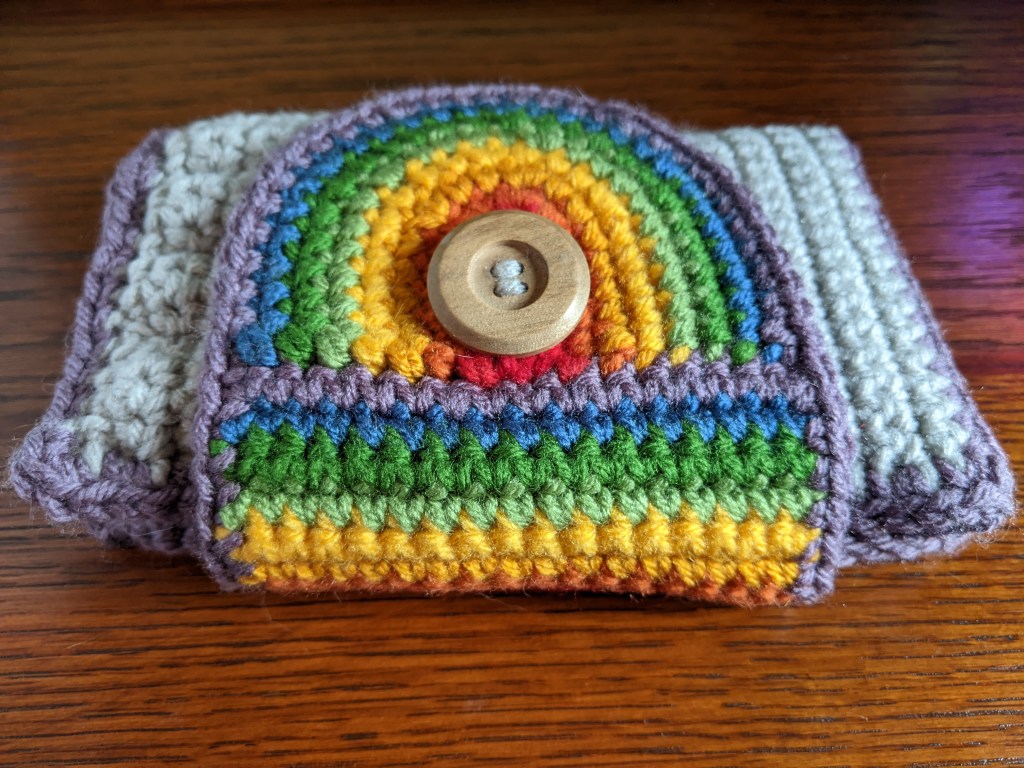
We’re down to the last step: sewing on the button! With the hooks inside the case, fold it up to see where the buttonhole lands on the outside of the backer. I used a couple of my darning needles to mark the left and right edges of where the buttonhole sits.

Sew your button on using your favorite button sewing technique (I used soft gray to sew mine on) and then test it out before weaving in the ends.
If you have any yarn tails left hanging around, sew ’em in!
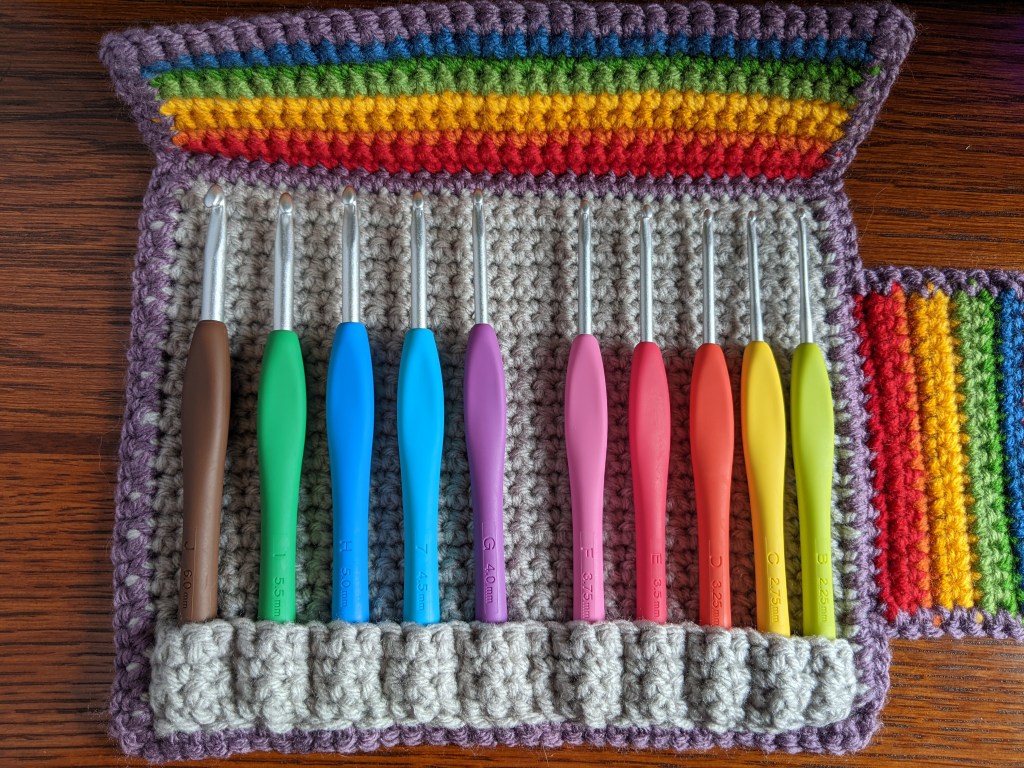
And… you’re done!! I hope your hooks find it nice and cozy in here. :) If you do end up following my pattern, whether it’s rainbow-colored or not, I would absolutely love to see it. Happy crocheting!

